
Notifications은 Cocoa의 Pub-Sub Pattern중 하나로, broadcast 방식으로 여러 객체에 이벤트를 전달 할 수 있다.
동작부터 알아보자면
- event를 보내는 Object는 Notification 객체를 만들어 post한다
- 이 Notification 객체는 NotificationCenter로 가게 된다.
- 해당 event를 받고 싶은 객체는 Observer를 통해 NotificationCenter에 등록한다.
- NotificationCenter는 등록된 객체에게 broadcast방식으로 Notificatoin 객체를 보낸다.
Notification Object
앞서 살펴보았듯이, event를 보내기 위해서는 Notification 객체를 생성 해야 한다.
Notification 은 observer로 등록된 객체에게 전달되는 Notification 객체에 대한 정보를 포함 하고 있다.
Notification의 내부 property에는 다음과 같이 존재하는데!
public var name: Notification.Name
public var object: Any?
public var userInfo: [AnyHashable : Any]?
각 Notification은 전역적으로 name으로 식별된다. 따라서 이는 Unique해야 한다.
object는 발송자가 Observer에게 보내려고 하는 객체. 일반적으로 notificaion을 보내는 obejct
userInfo는 Dictionary 타입으로 이벤트(notification 객체)에 대한 정보(value or object)가 저장된다.
NotificationCenter
발송자는 Notification의 객체를 생성하여 NotificationCenter를 통해 post 한다.
post된 Notificatoin 객체는 NotificatoinCenter에 저장 된다.
NotificationCenter는 싱글톤으로 제공되며,
notificatoin(event)를 받고 싶은 객체는 NotificationCenter를 통해 observer를 등록하고,
observer를 통해 event를 전달받은 객체는 이 event를 처리 한다.
NotificationCenter는 기본적으로 Synchronously(동기적)으로 이벤트를 처리 하기 때문에,
notificatoin들이 broadcast되어 전달된 후, 해당 notification을 처리할때까지
발송자는 통제권을 돌려 받지 못한다.
즉, 이벤트를 처리할 때까지 기다려야 한다.
하지만 이는 NotificationQueue를 이용해 Asynchronously(비동기)로 처리가 가능하다.
Notification in Swift
notification 발송을 위해 NotificationCenter의 post method를 사용한다.
 func notifyNewProduct() {

        NotificationCenter.default
            .post(name: Notification.Name("jung"),
                  object: nil,
                  userInfo: [
                    "date" : "2022.10.04",
                    "productName": "iPhone 14"
                  ])
 }
Notification.Name은 extenstion으로 사용하면 더 편리하게 사용이 가능하다.
extension Notification.Name {
    static let key = Notification.Name("jung")
}


 func notifyNewProduct() {

        NotificationCenter.default
            .post(name: Notification.Name.key,
                  object: nil,
                  userInfo: [
                    "date" : "2022.10.04",
                    "productName": "iPhone 14"
                  ])
}
이렇게 post를 진행하면 event를 받고 싶은 객체는 NotificationCenter를 통해 Observer를 추가한다.
NotificationCenter.default
    .addObserver(self,
                 selector: #selector(getNewProductInfo(_:)),
                 name: Notification.Name.key,
                 object: nil)


//handler
@objc func getNewProductInfo(_ notification: Notification) {
    print("나는 \(name)")
    if let date = notification.userInfo?["date"] as? String {
        print("날짜 \(date)")
    }
    if let productName = notification.userInfo?["productName"] as? String {
        print("제품이름 \(productName)")
    }
}
NSNotification vs. Notification
Notification에 대해 공부를 하면서, NSNotificatoin을 보게 되고, 이둘의 차이점에 대해 궁금해서 추가해보았다!
실제 apple documentation에서 NSNotification 의 내부 Property 에도
open var name: NSNotification.Name { get }
open var object: Any? { get }
open var userInfo: [AnyHashable : Any]? { get }
Notification과 엄청 유사한 property들이 있었다.
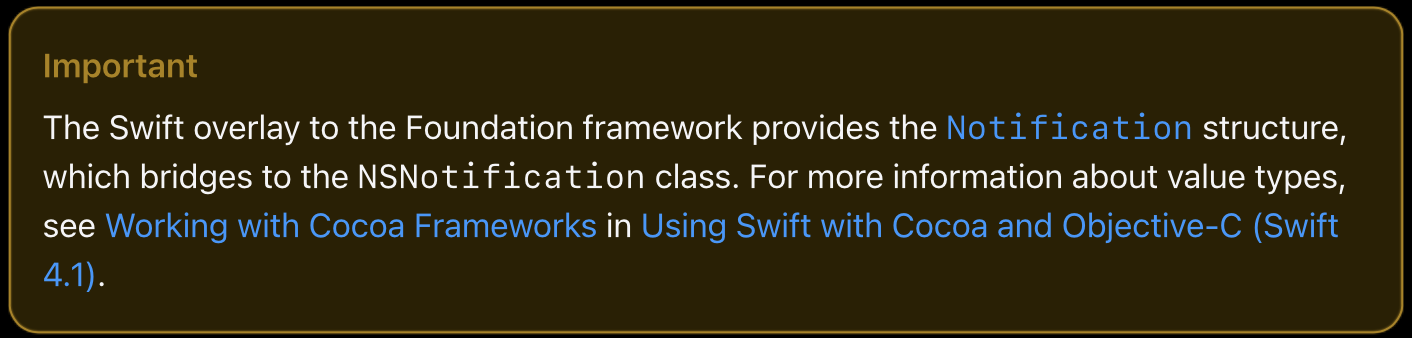
Swift Foundation Framework는 Notification structure를 제공한다.
그리고 이 Notification structure은 NSNofication과 bridging 되어 있다!
실제 Notification 내부를 보면
typealias Notification.ReferenceType = NSNotification이렇게 되어있다.
즉, Swift는 objective-c기반이며,
Objective-c의 NSNotificatoin class를 bridging 하여,
Notification struct 타입으로 Foundation을 통해 제공한다!
Reference
Apple Documentation
'iOS > Swift' 카테고리의 다른 글
| [Swift] Initializer(1) (0) | 2022.11.09 |
|---|---|
| [Swift] KVO, Delegate and Notification (2) | 2022.10.08 |
| [Swift] Delegate (0) | 2022.10.07 |
| [Swift] KVO (Key-Value-Observing) (0) | 2022.10.06 |
| [Swift] KVC (Key-Value-Coding) (1) | 2022.10.05 |