OperationQueue는 내부적으로 DispatchQueue를 기반으로 하여,
더 많은 부가적인 기능을 사용할 수 있는 Queue이다.
부가적인 기능으로는 "작업 취소 및 일시 정지", "작업 순서 지정", "CompletionBlock"등이 있다.
GCD의 Dispatch Queue는 Task를 다음과 같이 클로져 형태로 추가하였다.
DispatchQueue.global().async {
    ...
}
반면, OperationQueue의 작업의 단위는
Operation이라는 추상 클래스를 구체화한 Object의 instance가 된다.
Operation은 수행할 작업들을 캡슐화를 한다는 점에서 재사용에 대한 이점이 있다.
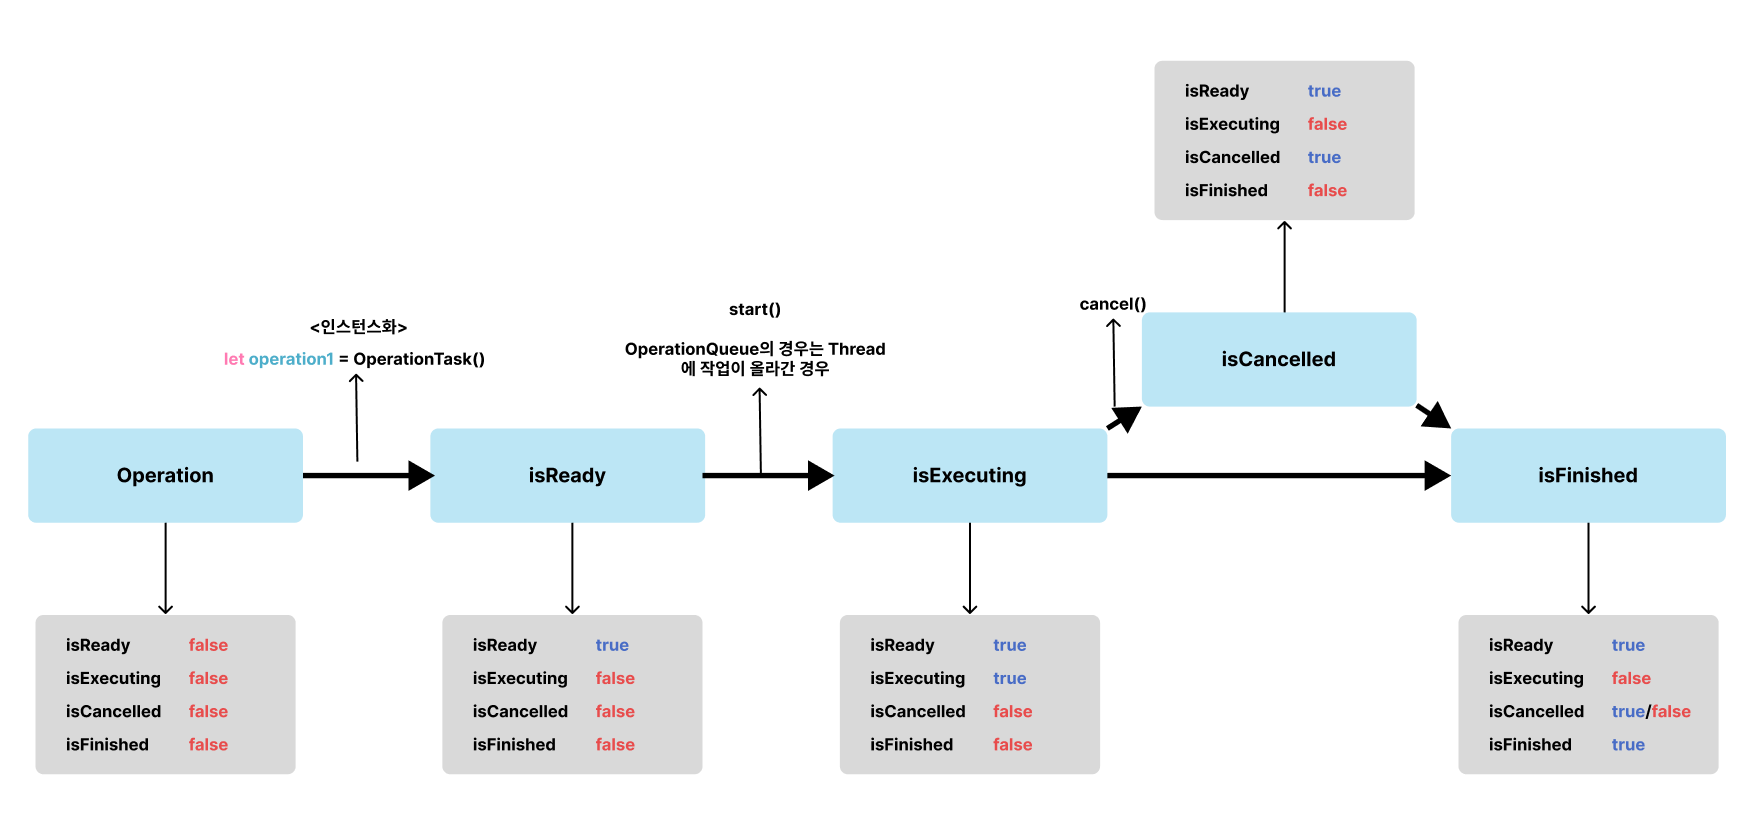
Operation
앞서 말했듯이 Operation은 추상(abstrat) 클래스이기에
Operation작업을 정의하기 위해선 해당 추상 클래스를 상속받아 구체화해야 한다.
아래와 같이 수행할 작업은 main()함수에 정의한다.
class OperationTask: Operation {
    var inputNumber: (Int, Int)?
    var outputNumber: Int?

    // 수행할 Task를 정의
    override func main() {
        guard let input = inputNumber else { return }
        outputNumber = input.0 + input.1
    }
}
GCD에서는 작업을 시작하기 위해선 DispatchQueue라는 "대기행렬"에 넣었다.
Operation 역시 Operation을 구체화한 클래스의 인스턴스를 OperationQueue라는 "대기 행렬"에 넣을 수도 있지만,
해당 인스턴스의 start() 메서드를 통해 자체적으로 실행시킬 수도 있다.
start() 메서드는 main()에 정의된 task를 실행시키는데 현재 Thread에서 sync적으로 수행된다.
let operation1 = OperationTask()

operation1.inputNumber = (10, 20)

// 실행 -> 현재 Thread(Main Thread)에서 동기적으로 실행
operation1.start()

if let result = operation1.outputNumber {
    print(result)
}

/* Prints:
 30
*/
Life Cycle
Operation은 state(상태)를 가지고 있다.
- isReady : 작업이 준비된 상태 (인스턴스 화 했을 때
true로 변경) - isExecuting :
start()메서드의 호출로 작업이 시작되었을 때true로 변경 (OperationQueue에 넣었을 때는 Thread에 배정되었을 때true로 변경) - isCancelled :
cancel()함수가 호출되었을 때true로 변경 - isFinished : 작업이 끝났을때,
true로 변경
state 프로퍼티들은 Read-Only이기 때문에 개발자가 변경할 수 없지만,
KVC, KVO를 준수하기 때문에, 해당 state 프로퍼티를 감지하고 관리한다.
Operation의 시작을 위해서는 isReady 프로퍼티만 true여야 한다.
하지만, 한번 실행된 Operation은 isReady, isFinished까지 true이기 때문에
한번 인스턴스화되어 실행된 Operation은 재실행이 불가능하며, 이를 single-shot object라 부른다.
이러한 state 프로퍼티들을 통해 "작업의 취소", "작업의 순서 변경", "completionBlock" 등 여러 가지 기능들을 사용할 수 있게 된다.
이 중 "completionBlock"은 작업이 완료되는 시점에 호출되는데,
즉, isFinished가 false에서 true로 변경되었을 때 호출된다.
operation1.inputNumber = (10, 20)

operation1.completionBlock = {
    print("its finish")

    guard let result = operation1.outputNumber else {
        return
    }

    print(result)
}

// 실행 -> 현재 Thread(Main Thread)에서 동기적으로 실행
operation1.start()

/* Prints:
 its finish
 30
*/
Block Operation
Operation을 구체화한 클래스인 BlockOperation은 작업을 Block단위로 추가시킬 수 있는데,
Block을 클로져 형태로 추가할 수 있다.
따라서, DispatchGroup과 같이 사용 할 수도 있고, 클로져 형태로 간편하게 작업을 추가할 수도 있다.
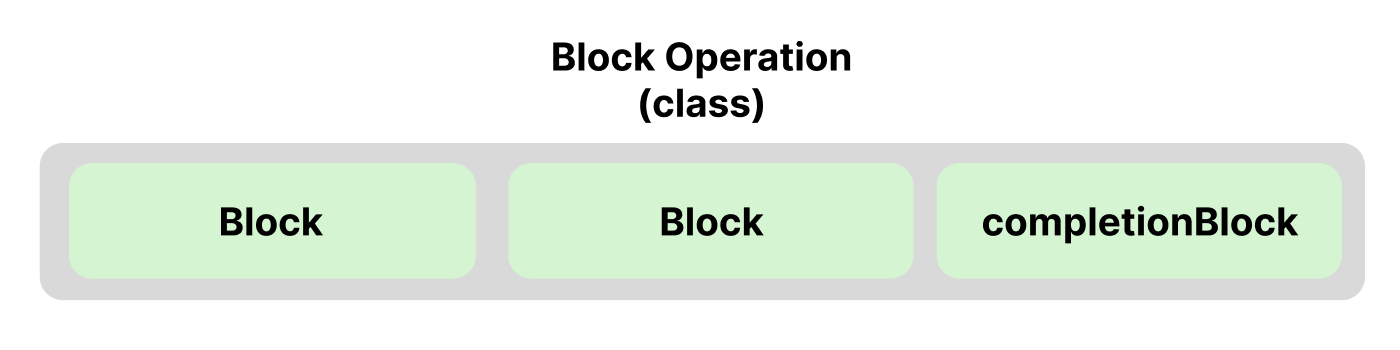
Operation을 구체화한 클래스이기 때문에, completionBlock과 같이 Operation에서 사용하였던 기능들은 전부 사용가능하다.
let blockOperation1 = BlockOperation()

// 클로져 형태로 Initialize가능
let blockOperation2 = BlockOperation {
    sleep(3)
    print("someTask2")
}

// 해당 메서드를 통해 작업 추가 가능.
blockOperation1.addExecutionBlock {
    sleep(3)
    print("someTask1")
}

blockOperation2.addExecutionBlock {
    sleep(3)
    print("someTask2")
}
BlockOperation은 Block들을 Default Global Queue로 보내어 Concurrent하게 작업을 수행한다.
하지만, Operation과 같이 동기적(sync)하게 수행된다.
let time = progressTime {
    blockOperation1.start()

    // 동기적으로 수행되기 때문에 blockOperation2는 blockOperation1이 끝난후 실행.
    blockOperation2.start()
    // blockOperation2는 2개의 block이 있지만, concurrent하게 진행되기에 3초걸림.
}

print(time)

/* Prints:
 someTask1
 someTask2
 someTask2
 6.005294919013977
*/
Async Operation
비동기 Operation이란, Operation에 비동기 작업이 있을 경우를 말한다.
main() 메서드에 작성한 작업은 동기적으로 수행되기 때문에, 작업이 끝나는 시점이 비동기 작업으로 인해 맞지 않을 수가 있다.
이에 따라 isFinished가 되는 시점을 개발자 변경해주어야 하지만, Read-Only이기 때문에 변경이 불가능하다.
따라서, Operation을 상속하여 AsyncOperation을 만들어 사용해야 한다.
이는 애플에서 따로 제공하지 않기에, 구글링을 통해 다른 분들이 구현한 코드를 가져다 쓰면 된다.
OperationQueue
Operation 역시 OperationQueue라는 "대기행렬"에 넣어서 실행 시킬 수 있는데, 작업이 async적으로 수행된다.
func addOperation(_ op: Operation)

// Operation 배열 형태로 추가 가능.
// wait는 Operation이 끝날때까지 동기적으로 기다린다.
func addOperations(
    _ ops: [Operation],
    waitUntilFinished wait: Bool
)

// Block Operation
func addOperation(_ block: @escaping () -> Void)
let operation1 = OperationTask()
let operationQueue = OperationQueue()
operation1.inputNumber = (10, 20)
operation1.completionBlock = {
print("its finish")
guard let result = operation1.outputNumber else {
return
}
print(result)
}
operationQueue.addOperation(operation1)작업을 동기적으로 기다리고 싶다면, waitUntilAllOperationsAreFinished() 메서드를 사용하면 된다.
Concurrency Queue & Serial Queue
OperationQueu는 maxConcurrentOperationCount라는 프로퍼티를 통해 Serial, Concurrency 설정이 가능하다.
해당 프로퍼티를 1로 설정할 경우 Serial Queue가 되며, 2이상으로 설정할 경우 Concurrency Queue가 된다.
default로는 -1로 설정돼있으며 시스템의 조건에 따라 동시 작업의 수를 결정한다.
Qos
Operation을 인스턴스화한 경우, default Qos는 background이다.
이는 qualityOfService 프로퍼티를 통해 변경이 가능하다.
let operationQueue = OperationQueue()

operationQueue.qualityOfService = .userInteractive
Operation 역시 qualityOfService 프로퍼티를 통해 Qos를 지정해줄 수 있는데, OperationQueue의 Qos가 승격될 수 있다.
또한, 기반이 되는 DispatchQueue를 undelyingQueue라는 프로퍼티를 통해 지정해 줄 수 있는데,
해당 경우에는 기반이 되는 DispatchQueue의 Qos가 우선적으로 적용된다.
추가적으로 UI Update의 경우 main 프로퍼티를 통해 Main Thread에서 실행되는 OperationQueue를 리턴 받을 수 있다.
해당 Queue의 Qos는 userInterative로 설정이 되어 있으며, Qos와 underlyingQueue 설정이 불가능하다.
OperationQueue.main
Dependencies
다른 Thread에서 동작하는 작업들간에 의존성이 있는 경우 순서를 지정해주어야 한다.

serial Queue를 통해 해결 할 수도 있지만,
"다운로드"를 여러번 진행하여 한번에 "압축 풀기"를 수행 등
위와 같은 경우가 존재하기에 Concurrenct Queue로 얻는 이점이 존재한다.
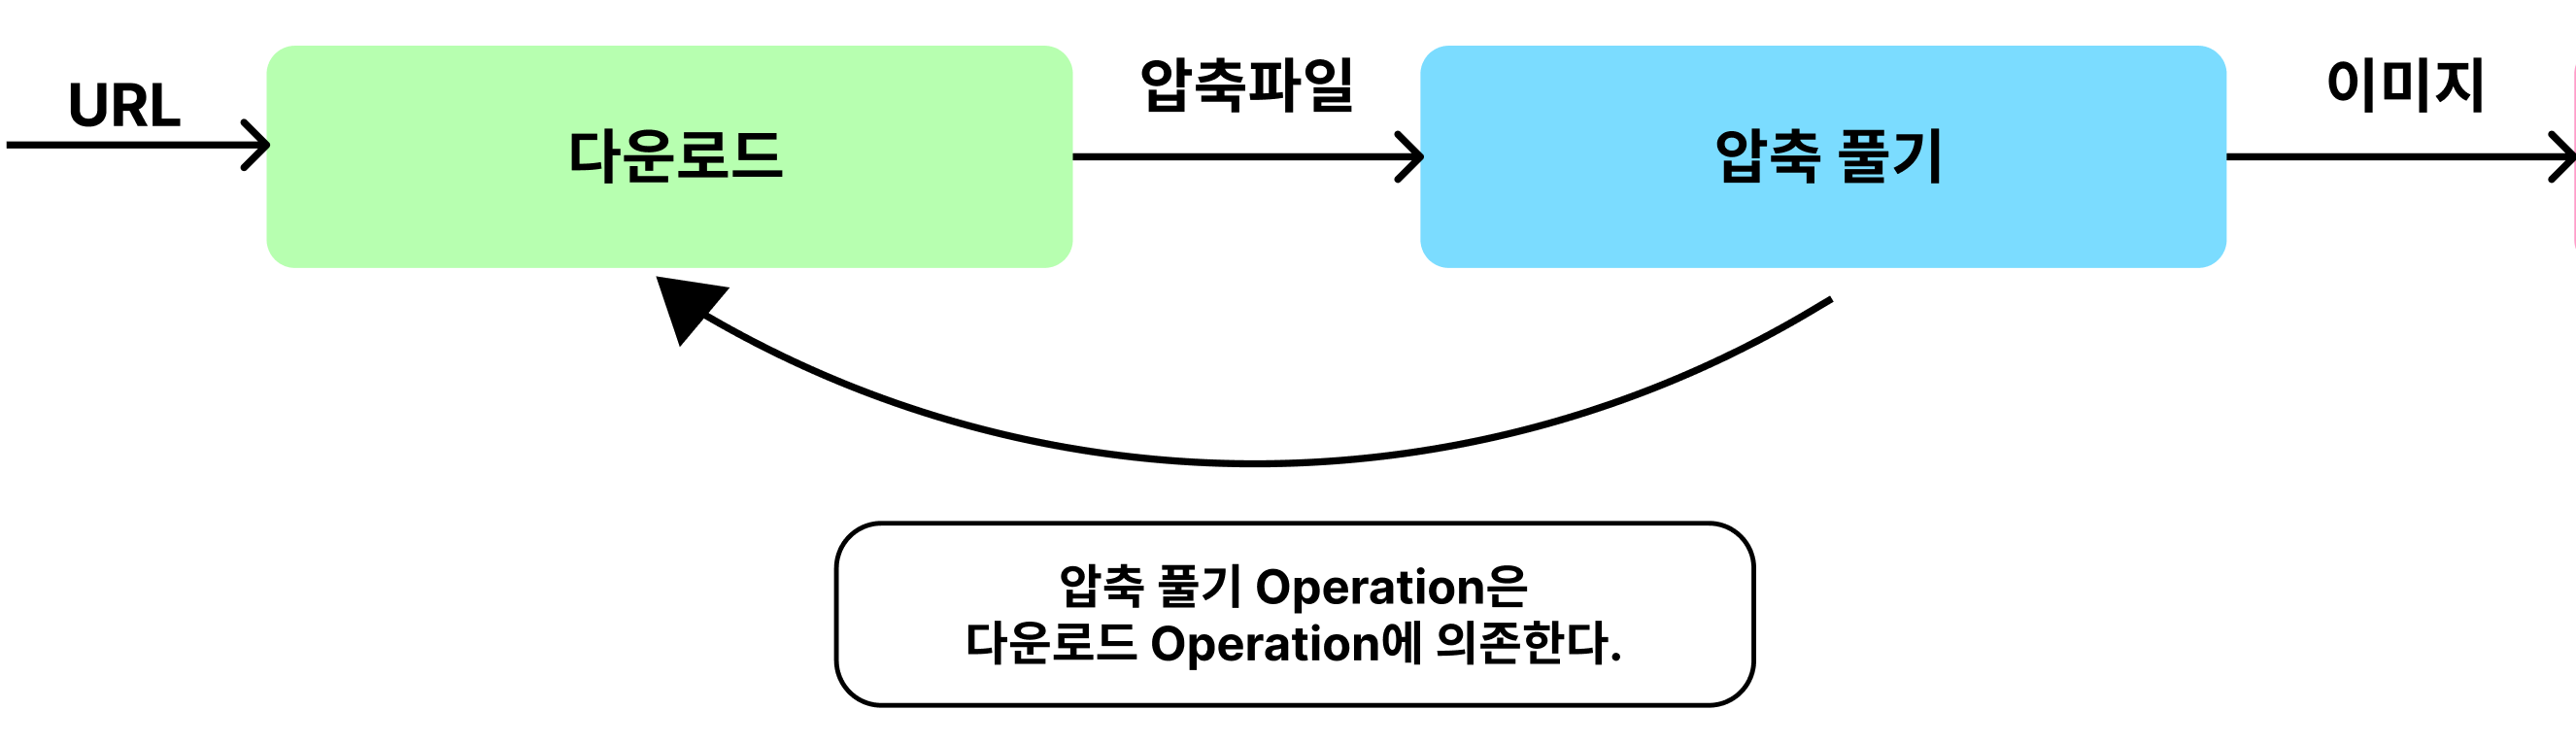
해당 경우에 "압축 풀기" 는 "다운로드"에 의존적이다 라고 표현하며 이를 코드로 표현하면 아래와 같다.
let downLoad = ImageDownLoadOperation()
let decompress = DecompressOperation()

decompress.addDependency(downLoad)
앞선 Operation의 output을 뒤에 오는 Operation의 Input으로 설정해주어야 하는데,
이는 프로토콜과 의존하는 모든 Operation을 배열 형태로 리턴하는 dependencies:[Operation] 프로퍼티를 통해 해결할 수 있다.
// 프로토콜
protocol ImageDataProvider {
    var imageData: UIImage? { get }
}

extension DecompressOperation: ImageDataProvider {
    var imageData: UIImage? { return outputImage }
}

class FilteringOperation: Operation {
    var inputImage: UIImage?
    var outputImage: UIImage?

    override func main() {
        if inputImage == .none,    // 인풋이미지가 없으면,
            let dependencyImageProvider = dependencies // 의존하는 Operation들을 리턴
                .filter({ $0 is ImageDataProvider}) // 해당 프로토콜 채택하는 Operation 선택
                .first as? ImageDataProvider {   // 의존하는 Operation중 첫번째
                inputImage = dependencyImageProvider.imageData
        }

        // 실제 작업
        outputImage = filtering(image: inputImage)
    }
}


let downLoad = DownLoadOperation()
let decompress = DecompressOperation()
let filtering = FilteringOperation()

let operationQueue = OperationQueue()

// 의존성 추가
decompress.addDependency(downLoad)
filtering.addDependency(decompress)

operationQueue.addOperations([downLoad, decompress, filtering], waitUntilFinished: false)
프로토콜을 이용하지 않게 된다면, output을 다음 Operation의 input으로 넘겨주는 Operation이 한 개 더 필요하게 되기 때문에, 프로토콜을 이용하자.
작업 취소 & 중단
작업의 취소는 Operation의 cancel()메서드를 통해 이루어지는데, 동작은 DispatchWorkItem의 cancel()과 유사하다.
cancel()메서드는 단순히 isCancelled프로퍼티만 true로 변경한다.
만약 아직 실행중인 작업이 아니라면, isFinished가 true로 되면서 Queue에서 제거되지만,
실행 중인 작업이라면, isCancelled프로퍼티만 true로 될 뿐 작업이 중단되지 않는다.
실행 중인 작업을 취소하고 싶다면, 아래와 같이 main()메서드에 명시적으로 작성해주어야 한다.
class OperationTask: Operation {
    var inputNumber: (Int, Int)?
    var outputNumber: Int?

    // 수행할 Task를 정의
    override func main() {
        if isCancelled == true { return } // 취소되면 작업 중단!

        guard let input = inputNumber else { return }
        outputNumber = input.0 + input.1
        print(" -- operation1 -- ")
    }
}
func slowAddArray(input: [(Int, Int)], progress: ((Double)-> (Bool)) ) -> [Int] {
var results = [Int]()
for pair in input {
sleep(1)
results.append(pair.0 + pair.1)
if progress(Double(results.count) / Double(input.count)) {
return results
}
}
return results
}
class PairAddOperation: Operation {
var inputNumbers: [(Int, Int)]?
var outputNumbers: [Int]?
var progress: Double?
override func main() {
guard let input = inputNumbers else { return }
outputNumbers = slowAddArray(input: input) { [weak self] progress in
guard let strongSelf = self else { return true }
strongSelf.progress = progress * 100
return strongSelf.isCancelled
}
}
}
let operationQueue = OperationQueue()
let operation1 = PairAddOperation()
operation1.completionBlock = {
guard
let output = operation1.outputNumbers,
let progress = operation1.progress else { return }
print("\(progress)% 만큼 진행 : \(output)")
}
operation1.inputNumbers = [(1,2), (3,4), (5,6), (7,8), (9,10), (11, 12), (13, 14), (15, 16), (17, 18), (19, 20)]
operationQueue.addOperation(operation1)
sleep(3)
operation1.cancel()
/* Prints:
30.0% 만큼 진행 : [3, 7, 11]
*/
OperationQueue에서 cancelAllOperations() 메서드를 호출하게 되면,
Queue에 있는 모든 Operation들의 cancel()메서드를 호출시킨다.
작업의 중단은 OperationQueue의 isSuspended 프로퍼티를 true로 설정하면 된다.
다시 false로 설정하게 되면 Operation이 재게 된다.
Reference
Apple Documentation
'iOS > iOS' 카테고리의 다른 글
| [iOS] Layout(2) - Auto Layout (1) | 2023.02.02 |
|---|---|
| [iOS] Layout(1) - Frame-Based Layout (0) | 2023.01.21 |
| [iOS] 동시성 프로그래밍(7) - Thread-Safe (0) | 2023.01.14 |
| [iOS] 동시성 프로그래밍(6) - Concurrency Problems (0) | 2023.01.10 |
| [iOS] 동시성 프로그래밍(5) - DispatchSemaphore (0) | 2023.01.04 |